Sunday, December 6, 2020


Two for the Price of One!  That sounds like a great deal, especially for those plant addicts who just may have exceeded their horticultural budgets.  

So, you may have mastered propagation by rooting plants in soil & perlite/vermiculite, by division, and even by simple layering.  But, have you ever tried air layering?  Before you stop reading, please believe me that it isn’t as difficult as it may sound, and you will produce a beautiful, full-grown plant from your effort.

You have probably found that some plants are difficult to reproduce.  They don't produce viable seeds, and you can’t just make a tip cutting and root it in water or even a soil mix.  The answer is air layering. 

The tools you will need include:  a sharp blade, moistened sphagnum moss, rooting hormone, plastic wrap, twist ties, and some aluminum foil. Of course, you also need the “mother plant” which will produce the new plant.  Gather your tools for the procedure.  Having a friend to help can also be useful.  There are variations of this procedure, but this one has worked for me. 

On your plant, choose a healthy limb that is at least twelve inches long.  The plant can be potted or in the ground.  The best time of year is early spring, but it can be done most other times as well.  Spring is preferable because plants are actively growing.  If it is a houseplant, most any time is acceptable.


For this project, I chose a Ficus elastica (Rubber Tree).  With a sharp blade, score around the selected limb (just deeply enough to cut thru the outer bark layer).  Now drop down about 1 inch and repeat the scoring completely around the limb.  Then cut in a straight line from one score to the other.  At this point, you should be able to peel the one-inch outer layer off and expose the inner layer. 


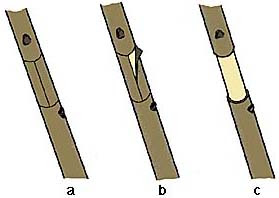
Apply a thin layer of powdered rooting hormone to the entire exposed area. Wrap a “handful” of damp sphagnum moss around the entire exposed area.  Hold the moss in place with plastic wrap. Secure the plastic wrap with twist ties or twine.  It should be very firm so that movement does not occur.  The hormone-coated, plastic-wrapped area should then be covered with a sheet of foil which is crimped to secure it. 


The moss must be kept damp, so pour a small amount of water into the core about once a week.  This can be accomplished by just slightly releasing the top twist tie and then securing it again.   After 4-5 weeks, roots should begin to appear.  After numerous roots appear, you may cut the stem just below the roots.


You have successfully produced a new copy of the mother plant.  Prepare a pot and plant your new baby.  As you accomplish this new propagation method, you will feel a great deal of pride and confidence.  Like so many other new things, air layering isn’t that difficult, and I hope you will try it soon.


Sunday, November 15, 2020


Nature-Inspired Holiday Decorations

How would you like to have more fun, spend less money, and save valuable resources?  

Then, I have some ideas you might appreciate.  

First, here’s what some are facing.

Let's avoid being that guy!   


Survey your surroundings


Make a promise to yourself today:  “I will NOT allow the holidays to cause me stress.”

There are so many ways to enjoy nature.  Take a walk and enjoy your surroundings.  Collect those items which make you smile.   Then simply arrange some of your found objects in a pretty container.   


Be creative and have fun!


And after you have created your own natural object, take a photo and share it with your friends.  
Then take some time to reach out to friends and family.  
Make that phone call; write that note.  
Remember we need to isolate now so that we can gather next year and no one is missing. 


Sunday, October 25, 2020


No, I am not Marie Antoinette, but I do behead my succulent plants.  Before you call the authorities, please let me explain.  As you probably know, I love succulents.  And as you also probably know, succulents can become leggy.  So, here’s the solution along with a perk!

If you have non-cold hardy (soft) succulents, they may grow beautiful rosettes during the summer.  But when the cold weather approaches and it’s time to bring them inside, you face a dilemma—"what to do with the beautiful rosettes on a long stem?”.


You have two options.  You can leave the leggy stem and rosette intact, or you can take out the tools for the decapitation.  That sounds so cruel, but it really isn’t.  Think about your summer perennials.  They always look better after you deadhead the spent flowers, and basically that is what you are doing with your succulents.  Additionally, you will be gaining a new plant from this surgical procedure.


The newly-cut rosette will become a new plant.  You will have two, or you can share one with a friend.  After beheading your succulent, simply lay it in a brightly-lighted area for at least 4-5 days to allow the newly cut area to callous.  Then you can plant it directly into a pot of well-draining succulent mix.

Alternately, you can place it in a decorative bowl or pot filled with pebbles and use it as a decorative plant in your home.  I used one in this way for about six weeks.  At the conclusion, the cutting had begun to root, and I then placed it in a pot of succulent soil.


Succulents like to be dry.  When friends tell me they cannot grow succulents, I usually respond that “they love them to death.”  In their zeal to help the succulents live, they overwater and/or don't give them enough light.

So, give beheading (your succulents) a try.  I think you will be pleased.


Tuesday, October 13, 2020


With several hundred existing species, there’s a lot to like about Hibiscus.  Whether they are short or tall, annual or perennial, fancy or plain, we all have our favorites.  One of my favorites is the frilly Hibiscus schizopetalus.

Hibiscus are versatile; some can be grown either in soil or in water.  For example, the perennial Texas Star Hibiscus (Hibiscus coccineus) is quite happy in our Dallas clay soil, but it is equally happy as a water plant in a pond.


Some Hibiscus flowers such as Lord Baltimore can measure 10 inches across.  Give these beauties a little extra water in the summer months, and they will reward you with plentiful blooms.  


Hibiscus can be propagated in two different ways.  The first (taking vegetive cuttings) should be done in early summer.  Taking 4 to 6 inch cuttings and rooting them in 50/50 potting soil/perlite with extra moisture is not difficult.  If you have not tried this method, there are numerous videos online which may be useful.  If your Hibiscus is an annual, you should try this method.  Of course if you have space, you can always bring the plant inside for the winter.  


The second method is by planting mature seeds.  Do not pick the seed pods until they are brown and dry.  Remember, too, that some seeds may not be viable.  Also, some seeds do not reproduce true offspring.  After you have taken the seeds from the pods, place them in a glass of water.  Those seeds which float are probably not viable; the ones that sink should be fine.  Then heat about a cup of water to near-boiling.  Toss the seeds into the hot water and allow them to soak for 12 to 24 hours.  The seeds are then ready to plant.  Cover the seeds with about ¼ inch fine soil.  Keep the soil moist in a warm area (75 to 85 degrees).  The seeds should germinate in about two weeks.  New seedlings (even those which are perennial) must be protected from frost.  Seedlings should be moved into larger pots as they mature.

When you plant your mature Hibiscus outside, as with most plants, mulching around the base is important.  A layer of about 3 inches of mulch will help maintain moisture during the summer and keep the roots healthy during the winter.  It will also add nutrients to the soil and help prevent weeds from emerging in the spring.

Unfortunately, several garden pests also like Hibiscus, so be vigilant with an application of insecticidal soap or neem at the first sign of uninvited guests.  Pruning to shape your plant can be done anytime, but save the heavy pruning for late winter.  Cut the plant back to nearly ground level.  They like hot weather, so do not despair in the spring when they do not show life until April or May.  The phrase “some like it hot” truly applies to Hibiscus.  

So find a sunny spot in your garden, and add some fun with the perfect Hibiscus! 😊


Sunday, October 4, 2020


Scarifying Seeds  🎃

It may sound like Halloween, but scarifying seeds has nothing to do with the 'trick or treat' frenzy.  If you have ever tried and failed to germinate a large, dense seed, it may be that you should have scarified it.  All seeds have a coat to protect the seed embryo; however, some seeds have a very thick, hard coat.  Those seeds in nature may take years to germinate.  Some seeds are eaten by birds, and the acidic digestive juices help break down this coating.  Other seeds may go thru one or more seasons of freezing and thawing in order to break the covering.  Below are Texas Ebony seed pods.  The dried pod is as hard as some wood, and the seed is almost equally hard.


So how can you germinate these seeds without waiting for years?  First, remove the seeds from the pods.  Then you should determine which end of the seed has the remnant of attachment.  Next you should concentrate on scarifying (scratching) the opposite end.  Scarifying can be accomplished in several ways.  I prefer using some form of sandpaper, emery board, or some similar abrasive object.  The goal is to just file enough to break thru the seed coating.  There is generally a difference in color between the seed coat and the internal part of the seed.  You should not abrase it too deeply; you may harm the seed embryo.  If you look closely, you can see a small, scarified area that is slightly lighter on the seed below.  I scratched it with an emery board.  That scarified area will allow the water to penetrate the seed coat.  


Once you have completed this step, you should soak the seeds in water for about 24 hours.  During this time, you may observe the seed swell slightly (a good sign).  Water must penetrate the seed coat for germination to occur.  (Hint: generally, if the seeds sink to the bottom of the water container, they are viable; if they do not sink, they probably are not viable.)  Finally, the seed will be directly planted in a  pot and be kept in the greenhouse over the winter as it germinates.  


Next time I will discuss how to propagate Hibiscus plants from seeds. 😊


Friday, September 25, 2020

 You Need This Plant in Your Garden

When searching for a great addition to your pollinator garden, what are some of the prerequisites you require?

  •     nectar rich
  •     continual blooms
  •     waterwise
  •     perennial
  •    disease resistant

There may be many plants that meet these requirements, but there is one that is often overlooked.  That plant is Zexmenia (Wedelia acapulcensis var. hispida). 

Zexmenia defies our hot summer weather and is unperturbed by the humidity.  If it suffers from any disease issues, I have not found them.  Producing bright golden flowers from May thru November, this tough perennial will provide excellent nectar for smaller butterflies and other pollinators in your garden.  It will grow to a height of about two feet. 

I very successfully grow this winner in a brick-enclosed courtyard where most other plants have failed. 


Zexmenia happily survives on nature's rain and most any soil from clay to sand.  

You need this underutilized perennial Zexmenia in your pollinator garden.


Sunday, September 20, 2020

💗 For the Love of Seeds 💗


I am totally fascinated with seeds and seed pods, and fall is the prime time of the year to collect.  Seeds come in all shapes, sizes, and colors.  Of course, their real purpose is the reproduction of the plant; however, they are also a source of wonder and fascination.

The largest seed is the Coco de Mer which weighs about 40 pounds.  The smallest seeds are tropical rain forest orchid seeds which weigh only 35 millionths of an ounce.   

I could not possibly give a survey of all the interesting seeds and seed pods, but here are a few.

The Aristolochia tomentosa (Woolly Pipevine) is very intriguing due to its shape.  Most seeds are somewhat round or oval, but this one breaks that rule.  It is a triangle.  The seed pod itself is also interesting.  The grayish seeds are packed tightly together as if they had been lined up inside the pod.


Stately Magnolia trees are beautiful, but equally lovely is its cone and brilliant red seeds.  Many find these cones a nuisance; however, I love to gather them and use them as decorative objects.  Sprayed with shellac, these beauties are a treasure.


Besides being a host and nectar plant for Monarch and Queen butterflies, the milkweed plants produce amazing seeds.  Nestled tightly inside the pod, each of these brown seeds is attached to a fluffy white silk.  The silk can be used in all kinds of commercial applications and floats in water while supporting as much as thirty times its own weight.  Its real purpose, however, is to help the seed fly away to start a new plant.


As you enjoy the cooler weather and have the opportunity to walk around your neighborhood, look for interesting seeds and seed pods.  Nature is fascinating! 

Thursday, August 27, 2020

Succulent Pumpkins


Okay, I know that it’s not even September, but if Starbucks can advertise ‘pumpkin spice’ drinks, then I can surely talk about my all-time favorite craft project—SUCCULENT PUMPKINS!  Several years ago, I discovered this art, and I can’t wait to share it with you.  Nothing says “autumn” quite like pumpkins.  The days are growing shorter, the heat is beginning to break, and the holidays are approaching.  Let’s get creative!  You need a pumpkin, some sphagnum moss, a lot of succulent cuttings, a glue gun, and perhaps a helpful teacher on the side.  I also use other decorative items from nature, such as nuts and seed pods.  There are few rules—just have fun and be creative.  When the pumpkins are properly cared for, they can last for months.  I will be offering a class thru Texas Discovery Gardens in October.  If you are interested, I would love to have you join us.  To encourage you, I’ve included a few photos of some of my pumpkins from the past.  They can be large or small, fancy or plain, but once you create a Succulent Pumpkin, you will be hooked! 😊


This one was 3 months old and still looked great.  

This mini-pumpkin was beautiful with just a single succulent rosette.


All kinds of succulents.


Tuesday, August 25, 2020

Mangaves

 Mangaves are hot!  My love of succulents is no secret, and I have found one that is particularly fascinating.  Mangaves are a  hybrid created by cross-breeding Agave and Manfreda.  The result is a beautiful plant that thrives in our summer heat.  Actually, I should say 'plants' because there are a myriad of different varieties.  Some of these beauties are hardy to Zone 7; however, most are hardy to Zone 9 (20F).  Mangaves grow faster than agaves, and most don't have spines.  They also have interesting colors and shapes.  I like to grow Mangaves in pots so that I can move them around when necessary.  They require well-draining, gritty soil and sparse watering.  Many of them also produce offsets which then make nice presents for friends.  Full-grown Mangaves can be a bit pricey, so you may want to check out the plugs available thru Mountain Crest Gardens.  I have ordered plants from Mountain Crest for years, and I am always well satisfied with their products.  I've attached several of their photos, and I hope you will grow to love Mangaves as much as I do.  


Snow Leopard Mangave
(photo from Mountain Crest)


Silver Fox Mangave (photo from Mountain Crest)


Red Wing Mangave (photo from Mountain Crest)

Purple People Eater Mangave (photo from Mountain Crest)


Moonglow Mangave (photo from Mountain Crest)


Inkblot Mangave (photo from Mountain Crest)

Falling Waters Mangave (photo from Mountain Crest)

Blazing Saddles Mangave (photo from Mountain Crest)


Bad Hair Day Mangave (photo from Mountain Crest)


Pineapple Express Mangave (photo from Mountain Crest)